What is SmartCal®?
Cardinal Scale’s patented software algorithm called SmartCal is a method of calibrating a scale by placing a test weight over each load cell only once. You simply move the test weight over a load cell, press a key, then repeat for the remaining load cells and you’ve calibrated the scale. Using SmartCal, Cardinal Scale’s indicators automatically derive calibration constants which will be used to convert information from each load cell into scale weight.
SmartCal® vs Conventional Calibration
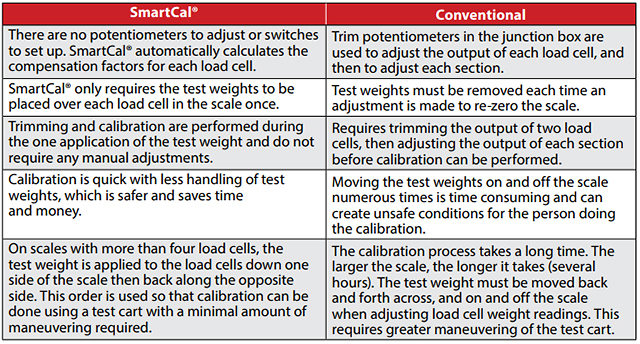
The table below is a comparison of SmartCal and Conventional calibration methods.
Performing a SmartCal® Calibration
One Step – Calibrate and Trim in One Pass
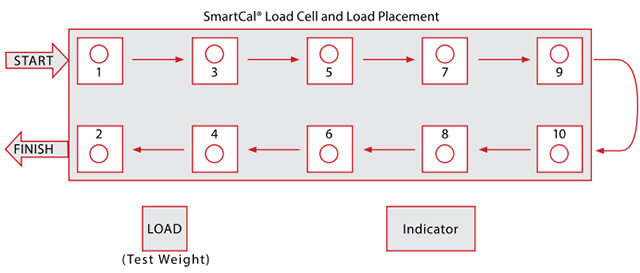
With Cardinal Scale’s SmartCal calibration, the calibration and trimming can be performed in one application of the test load to the scale. This is accomplished by applying the test load to the load cells down one side of the scale then back along the opposite side. For example, on a ten (10) load cell scale, instead of applying the test load from one side to the other side (load cell 1, load cell 2, load cell 3, load cell 4, load cell 5, etc.), with SmartCal, the odd numbered load cells (1, 3, 5, 7, and 9) are checked first, then in reverse order, the even numbered load cells (10, 8, 6, 4 and 2). Refer to the figure below. This requires a minimal amount of maneuvering the test cart, resulting in a much quicker calibration.
Performing a Conventional Calibration
First Step – Side to Side Adjustment
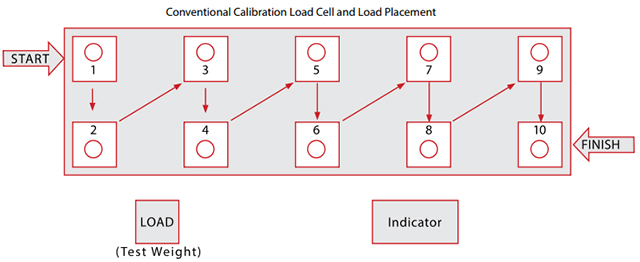
In a conventional calibration, the first step is to adjust side to side weight readings for each section of the scale. For example, on a (10) load cell scale, the test load would be applied first to load cell 1, then load cell 2 (section 1), then load cell 3 and load cell 4 (section 2), then load cell 5 and load cell 6, (section 3), etc. Refer to the figure below. This process takes a long time (several hours) and with a large scale, even longer. This also requires greater maneuvering of the test cart, due to moving the test weight back and forth across the scale to adjust the weight reading of each load cell.
Second Step – Section Adjustment (also known as Section-Sealing)
After the side to side adjustments have been completed, the next step is to adjust the weight reading of each section to match. This is often referred to as section-sealing. For example, the first section (load cells 1 and 2) must match the second section (load cells 3 and 4), the third section (load cells 5 and 6) must match the load cells section 1 and 2, and so on.
Third Step – Span the Indicator
Finally, after the sections match, you can calibrate the scale. The standard method is a dual-point calibration requiring an empty scale, the test load, and has one conversion factor. This method establishes a zero (no load) calibration value and spans the indicator. This method should be used for the first-time calibration and complete recalibration.

